Social Icons

Showing posts with label stripes. Show all posts

15 January 2013

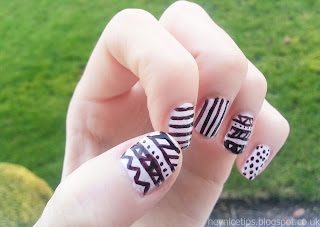
Monochrome Aztec, Spots & Stripes Nails


This tutorial shows how to create this black and white design, which features aztec, striped and spotted patterns. Monochrome is a big trend for this upcoming season, as well as stripes, so this design was inspired by that :)

1)

For this design you only need two colours: black and white. I used MUA All Nude and Barry M #47 Black. 

2)

Begin by painting two coats of your white varnish on all of your nails.

3)

For your little finger, use your black polish to add random black polka dots all over the nail. Do this by simply dabbing the corner of your brush to create the dots.

4)


For the aztec pattern on the accent nail, begin by painting two lines across the nail, then add some zig-zagging lines connecting the two. If you find this difficult, try using a toothpick instead of your nail brush to get a finer line.

5)


Aztec patterns are all about dots, lines and triangles, so you can pretty much chose whatever you like for the rest of the pattern. Try looking at my Black and Gold Aztec tutorial for some more ideas :). Here I just added some dots, then some slanted lines and then a thicker triangle design at the bottom. 

6)


Repeat the aztec pattern process on your thumb nail. 

7)


Next, using your black varnish carefully paint thin vertical stripes down your middle finger nail. 

8)


The last step is to carefully paint horizontal black stripes across your remaining nail. Try rotating your nail towards your brush stroke to get a smoother line.

And this is the finished black and white aztec/spot/stripe nail design :)


7 December 2012

Christmas Tree Nails


This tutorial shows how to make this colourful, stripy christmas tree design :)

1)


For this tutorial you will need black/darkbrown, green, red, white, clear topcoat and silver polishes. You'll also need some yellow and red nail gems (available on ebay pretty cheap :) )

2)


Start by painting your accent nail with your white varnish, then paint your remaining nails silver.

3)


For the first part of the christmas tree design, paint a small square shape at the tip of your accent nail with your black/dark brown varnish.

4)


Then, take your green shade and paint a triangle on top of the square up to just under half-way down your nail. 

5)

Next, paint another slightly smaller green triangle on top of the first one.

6)


Paint one more triangle on top, slightly smaller again. Then carefully paint lines on the edges of your triangles to make them less sharp and more tree-like. 

7)

Paint over your tree with your topcoat, then using tweezers apply a gold/yellow gem to the top in place of a star. Next, add as many red (or any colour you prefer) gems to the actual tree as decoration. 

8)


For the other nails, start your stripes from the top corner and work downwards. Make sure you let one stripe dry before painting the next or they will run into each other and you'll get a black smudge between them. Continue all the way across your nail. 

And this is the finished sparkly christmas tree nail art design :)