Social Icons

29 July 2012

2012 Olympics Nail Art


This is my London 2012 Olympics themed nail tutorial, it features a Team GB accent nail and the Olympic rings design on the thumbnail :)


1)


For this design you'll need six colours: white, dark blue, black, bright red, yellow and green. All of mine are form a Nail Star set. 


2)

The first step is to paint your accent nail blue, your thumbnail white and the remaining three red. Two thin coats usually gives the best finish and also dries alot quicker than a thick layer.


3)


For the first part of the UK flag, take your white polish and carefully paint a fairly thick line from the bottom of your nail upwards to the tip. Next, paint a line of the same thickness across your nail.


4)


Next, add slightly thinner, diagonal line from each corner of your nail towards the centre cross like in the picture above.


5)


Now take your red polish and carefully paint another cross on top of the white one, making these lines slightly thinner so a thin line of white is visible on either side.


6)


To finish the union flag design add thin red lines within the white diagonal lines but don't connect them to the red cross in the middle.

7) 

The next step in this tutorial is adding the Olympic rings: Start by carefully painting your blue, black and red rings from left to right across your thumbnail. Make sure you do not have excess polish on your brush as this will create a drag across the circle and end up filling it. If you find it difficult to make these circles try doing small dots very close together in a circle shape, it should give the same overall look :)

8)

Next, take your yellow polish and add the fourth ring between and slightly below the blue and black, overlapping them slightly. Repeat this with the green shade between the black and red rings to complete the design. 

And this is the finished London 2012 Olympics nail art design: 


26 July 2012

Strawberry Nail Art


This is a strawberry themed nail art design - I used the colours and features of a strawberry rather than trying to paint leaves etc as I wanted it to look more like the idea of a strawberry than an actual one :)

1)

For this design you'll need three bright colours - red, green and yellow. (These are from a set available from ebay)


2)


First paint two thin coats of your bright red polish on all of your nails.


3)


The next step is to create the idea of the strawberry's leaves - using your green polish paint a broad diagonal stroke across the top corner of your nails. Then fill in any bits you missed to create this triangular design. 


4)


Next, using your yellow polish add these dots all over the red part of your nails to create this strawberry seed polka-dot pattern. To make these dots, carefully use the corner of your brush and dab it on the nail. These dots can be as irregular as you like and you can add as many/few as you want. 


And this is the finished strawberry nail art design :) 


23 July 2012

Watermelon Nails


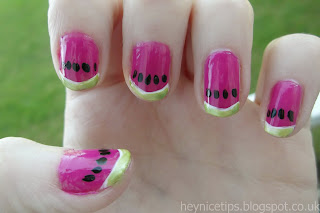
This is my watermelon nail art tutorial - a fun, bright design for summer :) 

1)

For this watermelon design you'll need four colours: black, white, bright pink and green. I used MUA's black varnish and the others are from a nail art set (from ebay). 

2)

Start by painting two thin coats of your bright pink polish on all your nails.

3)


Next, take your white polish and carefully paint a french tip style line across the top of your nails - it can be thicker than I've done here but any thinner won't really work. I find it easiest to do this in two steps rather than one stroke, first I paint a line from the left to the middle, then draw one from the right to the middle (both in a slightly curved motion). 


4)


Now use your green polish to add the outside colour of the watermelon - using the same technique as with the white. Leave a very thin line of white polish visible between the green and pink as this gives a bit more of a realistic and detailed look 


5)


The last step is to add the seeds - for this take your black polish and carefully paint these slightly pointy oval shapes on all your nails. The brush in the MUA polish was the perfect shape for this and all I had to do was dab the brush on the nail, but you may need to do a slight line with yours. Add as many seeds as fits along the width of each of your nails.


And this is the finished watermelon manicure :) 


18 July 2012

Lilac & Mint Metallic Manicure


This is my lilac and mint metallic manicure - inspired by spring/summer 2012's pastel trend :). This is a simple design with a lilac background and a slanted mint tip, separated by a thin metallic line.  


1)


For this nail art you'll need mint, lilac and silver varnishes. The ones I used are: Saffron Glossy Mint #55, Barry M Berry Ice Cream #308 and MUA #11. 


2)


First paint two thin coats of your lilac shade onto all your nails.


3)


Now add the metallic layer; take your silver polish and using your whole brush paint a broad line diagonally across the top corner of all your nails; then fill in any bits that were missed. The very top part will be painted over in the next step so it doesn't need to be perfectly covered.


4)


Next, take your mint polish and, using the whole width of the brush, paint a broad line across the very top corner, leaving a thin line of silver visible between the mint and lilac parts. Then fill in any of the corner that was missed in order to complete the design. 


And this is the finished lilac & mint manicure :) 


16 July 2012

Cherry Blossom Nail Art


This is a cherry blossom tree themed nail art tutorial with a dotted accent nail and a detailed tree design on the thumb nail with a mint background colour. 

1)


For this design you'll need 2 different shades of pink - one dark and one baby pink, a black (or brown) and a mint blue/green.  I used pinks from  a nail art set from ebay, a black MUA varnish and  Saffron shade #55. 

2)


First paint two thin coats of mint green/blue on all of your nails.

3)


Next, with your black (or brown) polish, carefully draw some branches; start with the longest diagonal line, starting in the bottom outside corner and bring it almost straight up to the opposite corner. Then add as many branches coming off of this line as you like, these will provide a guideline for adding your blossom later on. (These lines do not need to be perfect, slight imperfections will give a more authentic look :) )


4)


Now add the baby pink blossom; start from the outside of this cloud shape and work inwards towards the branches you painted on earlier.  Cover up some  branches and leave others exposed as you like.


5)


Next, take your darker pink polish and add some random dots to create more detail on your blossom - add the most closer to the branches and less toward the outside (they can be any size you like).


6)


 Next add some random cherry blossoms to the accent nail; start by painting random irregular dots of your light pink polish all over your nail. 


7)


Now add some detail to this cherry blossom inspired pattern; take your darker pink polish and add dots to your light pink shapes; these can be randomly placed and don't need to be in the centre. 


And this is the finished cherry blossom nail art design :)


15 July 2012

Elliott Smith Nail Art


This is a tutorial for my nail art based on the album artwork for Figure 8, an album by one of my favourite musicians Elliott Smith. I used a red polish for my nails with one accent nail, I had to simplify the design a little but I think it's close enough :)


1)


For this design you'll need a white, red and black nail polish. The red and white I used are from a nail art set I got from ebay, and the black is MUA from superdrug (I didn't use any special brushes for this). 


2)


First, paint your accent nail white and all the rest red. I prefer to use two thin coats rather than one thick layer as it seems to dry better and look more even. 


3)


Next paint two black diagonal lines across the very top of your accent nail; on the album artwork for Figure  8 the lines are not the same width all the way along so these do not need to be perfect! 


4)


Now add the red line; an irregular loop shape that goes from the top corner to the middle, then loops round and ends on the same side it started. I did this in 3 parts; firstly drawing a diagonal line downwards from the top left, then the curve, and then the line back to the left side.


5)


This image shows the final two steps: First I added to the second diagonal black line, adding a curve round from the right to left, following the general shape of the red line. Secondly I added an oval loop inside the red line to complete the design.  The real album art has two black lines inside, but my nail was too small so I decided that it'd look better with just the one rather than making it too crowded.


And this is the finished design :)